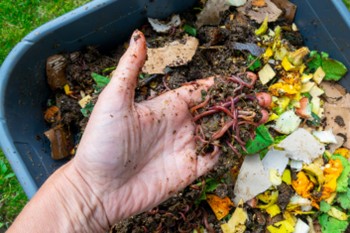
Worm farming, also known as vermiculture, is a simple way of composting organics in the comfort of your own home. A sturdy bin with a lid, bedding material (either bedding blocks or paper/cardboard), and worms are all that is needed to start your “farm”, which can be kept indoors or outside. Hungry worms make quick work of leftover food scraps, and over weeks and months, transform them into fabulous, nutrient-dense fertilizer (a.k.a. “worm poop”) that can be used for household plants or your outdoor garden. The worms also produce a liquid called leachate that is typically collected from the bottom tray or spigot of a worm composter that can be diluted with water to create “worm tea”. This “worm tea” is also a nutrient-rich fertilizer that can be sprayed on plants in your garden. Ready-made farms are available for purchase online, though it is no less effective and much cheaper to create one yourself. This how-to video from the Iowa Waste Reduction Council features step-by-step DIY instructions.
How to Create Your Own Worm Bin
Limited on space or don’t have access to the outdoors? No problem! Indoor composting is a great option—and it’s easier than you might think. If you are limited on storage in an apartment or small space, you can make your DIY worm bin in any size container, you’ll just want to adjust the ratios of worms, food, and bedding accordingly.
What You’ll Need:
- A container with two lids (plastic or ceramic preferred)
- Paper or cardboard
- Water
- Red Wiggler worms
Assembling Your DIY Worm Composter:
- Create small holes in the bottom of the container and in the lid you’ll use to cover the composter.
- Shred paper and cardboard, soak it in water, and then wring it out so it’s damp but not dripping.
- Line the bottom of the container with the damp paper—this should fill roughly one-third of the container.
- Add your worms along with a bit of soil. They’ll naturally burrow down to avoid light
- Add your food scraps and bury them under more damp paper. Always mix and bury any food you add.
- Cover with the perforated lid. Use the second lid as a tray underneath to catch any drips.
- Place your worm bin in a cool space, avoiding direct sunlight.
- Keep adding scraps until you notice more soil than food. At that point, stop adding scraps and let the mixture sit until everything is fully composted.
- Separate the compost from the worms—and you’re ready to start the cycle again!
Using Your Compost
- Fertilize your indoor or outdoor plants
- Give it as a gift to a green-thumbed friend
- Sprinkle it across your lawn or garden beds
No matter how you use it, feel proud—your food scraps are being effectively used instead of heading to the landfill!
Expanding Your Worm Farm & Collecting Compost
To harvest your compost more easily, stack a second container on top of your bin. Repeat the setup process as the first bin by adding proper bedding, soil, and food. Make sure it has holes in the bottom and lid. Add food to the top bin to encourage the worms to migrate upward. Once they’ve moved, you can collect the compost from the bottom bin—no worm sorting required!
How to Set Up Your Can-O-Worms Vermicomposter
Setting up your Can-O-Worms is easy! Just follow these steps:
- Attach the four legs to the base of the composter.
- Insert the spout into the opening on the base and lock it in place.
- Add cardboard (you can use the box that came with the composter).
- In a bucket, soak the bedding blocks in water, let them break down, then add the mixture to the composter.
- Add your worms—red wigglers are ideal.
- Cover the compost with a worm blanket to help regulate temperature, light, and moisture.
For a more visual guide, check out Jessie Grime’s video tutorial on setting up your own Can-O-Worms.
The Worms and Feeding Guidelines
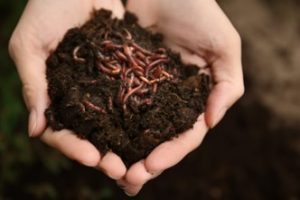
Not just any worm will do for a worm farm; red wigglers are best.
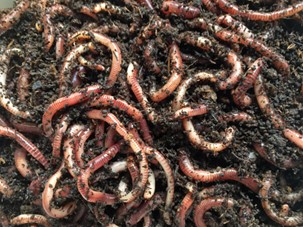
This type of worm especially thrives when eating decaying organic material. Garden centers often carry red wigglers, or they may be purchased online. For optimal results, worms are fed equal parts “greens” and “browns,” as it is called in the organic gardening world. These designations refer to the carbon to nitrogen ratio of the material, not the actual colors.
Feeding Guidelines

Yes: Fruit, vegetables, bread, coffee grounds, tea bags, dead plants/leaves, egg shells, uncoated paper (newspaper, coffee filters and other unbleached paper products) and vacuum cleaner dust.
No: Citrus fruits, onions, garlic, leeks or shallots, meat, fish or poultry, eggs, dairy, greasy food, salty food, prepackaged/processed food, and glossy/coated magazine paper or color dyed paper.
You should feed your worms one cup of food approximately once a week, but the frequency depends on the size of the bin, how many worms you have, and the type of food being fed to the worms. The smaller the pieces of food, the faster the worms can break them down, so it is a good idea to cut or tear up food scraps into smaller pieces before feeding them to your worms. Overfeeding your worms can lead to smelly bins and pests so it’s generally better to underfeed your worms than overfeed. If your worms haven’t broken down the food from the last time you fed them, that is a sign of overfeeding. In this case, pausing the addition of more food scraps until they have broken the existing ones down is the best course of action. Burying the food approximately 3-4 inches as you add it can also help to avoid unpleasant smells and pests such as fruit flies. You should add “browns” such as paper, cardboard, or egg cartons every time you add your “greens”, the food scraps.
Your worm bin must be kept between 40 and 80 degrees fahrenheit, but will thrive between 55 and 77 degrees. Under a kitchen sink, on a countertop, or in your garage is an ideal space for your indoor bin. Your Can-O-Worms can be kept outside, close to your home, or in a shed or garage. If you are concerned about freezing, you can use a thermal blanket to cover your bin, and follow these temperature regulating instructions from Worm Farming Secrets.
Your worm bin should feel like a damp sponge. If you can squeeze some of the compost between your fingers, and no liquid is released, that is ideal. The moisture levels should be between 60-70%. If your worm bin is too dry, you can spray water on the compost. If it is too wet, you can add additional “brown” material such as shredded newspaper or cardboard. Add either water or paper until you’ve achieved the ideal moisture level.
More Information and Troubleshooting
For further in-depth information on vermicomposting, curl up with the best seller, Worms Eat My Garbage: How to Set Up and Maintain a Worm Composting System, a great introductory guide to caring for your worms.
These guides from the EPA and the Rodale Institute are also helpful introductions.
Will my bin smell or attract fruit flies? How many worms will I need? These questions and more are answered by City Farmer.
Planet Natural also provides a great worm composting write-up for beginners.
Access this video to learn about how to set-up your worm farm from @flyfish.
Living in tight quarters poses unique challenges for those who want to compost. Learn how to do it in your apartment with this step-by-step infographic from Sustainable America.
Need of composting bins and supplies? RecycleMore offers residents of West Contra Costa County discounted compost bins and supplies.
RESOURCES
Video: How to Vermicomposting created and produced by RecycleMore
How to set up a video composting bin that is available for a discount for West Contra Costa County residents, businesses and schools, through the discount program, delivered around Earth Day/Earth Month.